When attempting to install the Windows 11 system, you might encounter a message stating, "This PC can't run Windows 11. This PC doesn't meet the minimum system requirements to install this version of Windows. For more information, visit //aka.ms/WindowsSysReq." If your computer hardware does not meet the installation requirements for Windows 11, consider following these steps:
Important Note: This tutorial is intended for technical communication purposes. If your computer hardware falls short of the Windows 11 requirements, it is advisable to install a lower version of the operating system for a more stable performance, such as Windows 10.

1.Preparation
- rufus 4.1 and above
- >8G capacity USB flash drive
- Windows 11 ISO file, download address: Download Windows 11 (microsoft.com)

2.Create installation media
Download and install rufus version 4.1. This article uses rufus 4.1 as an example. Download address: Index of /downloads (rufus.ie)

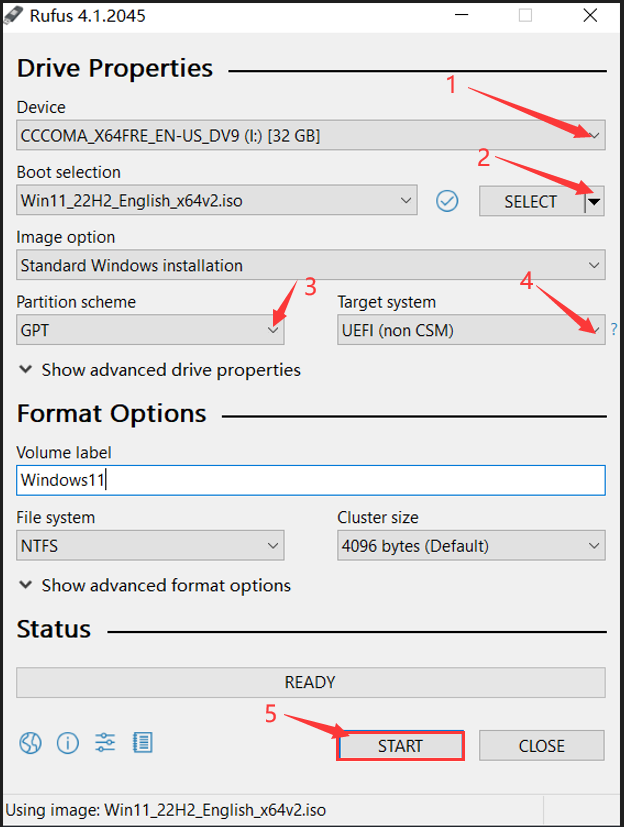
Insert the USB flash drive and take note of its drive letter. Open Rufus, then select the USB flash drive under "Device" and the Windows 11 ISO file under "SELECT". Choose "GPT" under "Partition scheme" and "UEFI (non CSM)" under "Target system". Click "START" to proceed.
A prompt will appear for custom system settings. Check the options "Remove requirement for 4GB+ RAM, Secure Boot and TPM 2.0" and "Remove requirement for an online Microsoft account". Click "OK" to begin writing the files. Wait for the process to complete, then safely remove the USB flash drive.


3. System Installation
Friendly Reminder: Before proceeding with the system installation, it's advisable to disconnect both wired and wireless network connections to expedite the installation process. This blog post guides through installation steps while offline.
Insert the USB flash drive into the corresponding USB port of the targeted model for system installation. Power on the computer by pressing its switch button. Quickly press either the F7 or F11 key on the keyboard (depending on the model) to access the boot menu. Select the USB flash drive prefixed with "UEFI:" and press Enter to initiate the system installation process.
Follow the on-screen prompts to complete the installation. The subsequent screenshots provide visual aid for each installation step.


Enter the Windows 11 license, you can go to Microsoft official purchase or consult your hardware supplier to get the license, if you don't have a license you can click "I don't have a product key" to go to the next step.

Select the desired system version and click "Next". (Note: The selected system version and the license version must be the same, otherwise the activation will fail!)

Check the license terms and select Custom Installation.


The new hard disk needs to create new partitions, such as the original hard disk has a partition needs to delete all partitions in the hard disk.
Note: Deleting hard disk partitions will delete the original hard disk data, please make sure you have backed up important data before operation!


Once the system deployment is finished, disconnect the USB flash drive from the computer. Proceed to reboot the computer, after which you will enter the system setup wizard. Kindly follow the on-screen prompts to continue with the setup process.


Enter your username and password, if you don't need to set a password please click Next.


At this point, the system has been installed, you may also need to manually install some drivers, check whether the operating system has been activated successfully, and so on.